
Shaders offer a wealth of options in lighting and patterns, and as such should be brilliantly and commonly used to great effect when rendering multitudes of creatures and natural inhabitants. However, with the exception of Spore, Left4Dead, CS:GO and No Mans Sky, they generally haven’t.
Fundamentally, the method goes like this: each ‘thing’ gets some unique ID or data, much like a strand of DNA. Then, a shader takes that information and passes it through a series of operations to generate a colour/texture output, which is then sent back to the model for display. I’m just going to show the simple mode; creatures (not humans) and RGB only (though the same techniques applies to UV and IR wavelengths). Be aware that what might look good or bad for us wouldn’t be the same for animals (that may have varying degrees of colour blindness) And I’m using the NeoFUR Sabertooth model and fur system for testing, and I only supply the colour, not fur length/condition.
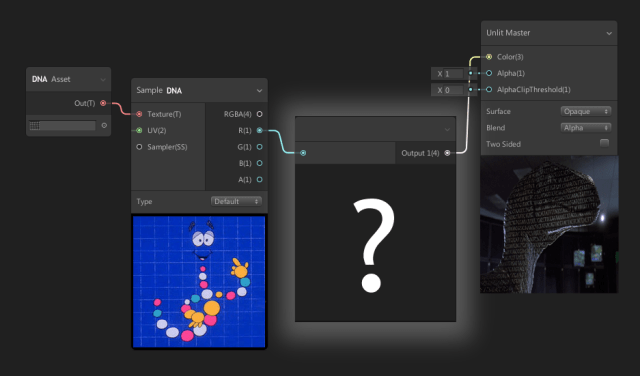
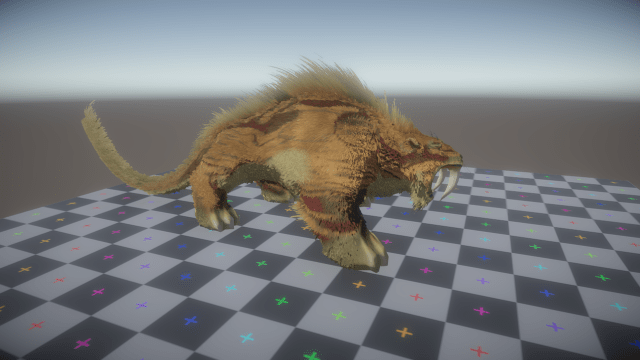
The first step is breaking down the colour pattern of an animal. Fight off the bat you want to remove as much lighting information as possible, appearing as a flat surface, with little visible 3d form factor within your viewed area. This means using the world y normal direction (sun is usually above) and applying counter-shading based on that; darker on top, lighter around the sides and bottom, to cancel out the direct light shading. Another thing to consider is the ambient light. This can be achieved with the AO map, remapped from 0-1 to 1.5-0.5 then multiplied over the albedo. This lightens the dark areas (see the neck) and darkens the open areas (on top of the face).
Belly-shading is another form of countershading that, along with a change in surface density/roughness, adds variation and lessens the effect of lighting. Beyond that, you have patterns. This start with the basic, a gradient from head to tail. While often hard to notice, it does give a higher chance of blending in, at least partially. More simple layers are applied over the back and sides; to break up the shape with colours or patterns similar to the environment. Even more complex are disruptive patterns; these are effective at disorienting or dazzling in specific environments; think the vertical stripes on a zebra or tiger that are hard to get a good ‘visual lock’ on.

Applying the patterns is also something to consider. As I’m working with model and texture data that wasn’t created for this purpose, I had to keep the default UVs. However, this is almost a blessing in disguise – by generating the pattern UV I can mess with it in the shader; fine-tuning things like the scale of patterns on the tail (giving me better results if I want a long-tailed animal that doesn’t have visible stretching). The technique I use is radial or polar mapping – this is fairly straightforward and takes a position map (normalized 0-1 position in world space baked to UV) as an input. I’ve multiplied and frac’d it to be easier to see below.

Camouflage is also most effective when disrupting features like the creature’s eyes, ears, feet, or tail; parts that are soft and easily damaged, critical to the animals survival or the tips or corners of a limb. For appendages this means larger, darker, patterns to blend into the ground surface. For the eyes, however, you see the best results when dark lines or streaks travel in the direction of the spine or body – the eye is no longer a single black point but could be anywhere on a line.

On the opposite end of the spectrum is the flare coloring and other features. While typically not obvious on carnivorous creatures, it’s quite common with birds and animals lower down on the food chain. That said, this is a somewhat fantasy creature, and the flare is seen in large cats like lions (used for attracting females and protecting the neck) so let’s give it one. This doesn’t automatically map itself well – you might need to manual paint a mask for it. If you do want to try mapping for it; the feature is usually seen on mammals and birds around the chin/nose, along the spine, around the neck, or across the tail. For insects, the flare is often seen on the legs, abdomen and wings.

Layering is a fairly simple process – base colour, colour pattern, disruption pattern, feature pattern, belly and counter-shading, flares,then eyes/mouth/claws.
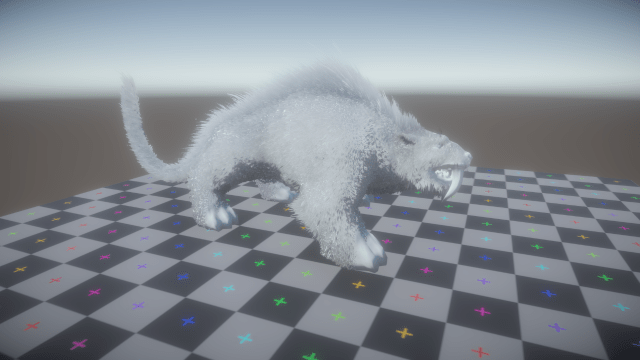
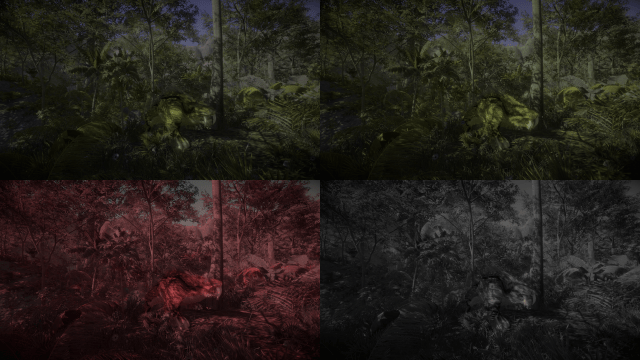
Typically, the effectiveness of camouflage patterns scale drastically with the environment. On the Unity UV checkerboard it might (probably will) look bad the real test is to see it against the correct background. As before, there’s 3 of them in this image. Below are the un-textured, black fur base models for comparison.
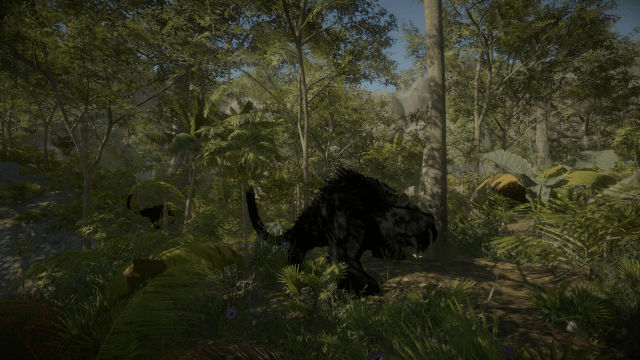
How well did you do? The main one is pretty easy to spot – it’s not behind anything, it’s standing tall and roaring with it’s mouth open and giant fangs out. The others? Not so much, despite having the same pattern (and even the same pose at the time of the screenshot). You can see the tail is almost gone and not visibly connected to the body. The dark red lines break up the limbs and body, and make it almost impossible to pinpoint the eye, while there’s enough high-frequency detail to blend with the shadows of the forest canopy.
But, you think they were hard to spot now? You can see orange! Let’s see what this same scene looks like with (from top left) Protanopia, Deuteranopia , Tritanopia, and Achromatopsia. Then, imagine the middle sabertooth was instead crouching, prone, perfectly still, or moving slowly, and not out in the open – you’re 100% dead.
Some background reading on the topic…
Valve have been using this for nearly 10 years now (to my knowledge). Starting with Left4Dead’s zombies, they found that having too few combinations of clothing colours made the zombies too repetitive, and the amount required to solve that would take too much memory. The compromise was a gray-scale gradient map, that could be sampled to colour each zombie a different colour. Note the available ramps in the middle image; each would output a different zombie.
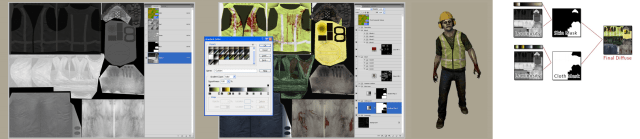
Techniques in Left 4 Dead 2
BRONWEN GRIMES, VALVE
Counter Strike is somewhat less sophisticated. For the weapon finishes, the item ID is used as a UV offset, a noisy lerp to a base undercoat, a blend to shininess, and some other basic options. Easy way to get variations for patterns like camouflage, but since they’re ignored in favour of shiny paintings and graphics the system’s main purpose is determining wear patterns. Pictured below is said wear function, the only bit anyone actually cares about nowadays.

Now, for Spore. This is a game/sim hybrid allowing people huge customization abilities in creating their creature. Extrude the spine, draw limbs out and map out the face of your desired creation. Ocean Quigley and his team at Maxis certainly had a challenging system to work with.

At the core though, this seems to be an artist-oriented approach rather than a purely scientific or competitive endeavor. This can be seen through the stat-based creature performance rather than any analytical analysis; speed, agility, visibility, etc are preset values added by part rather than through testing of the creature’s mechanical effectiveness. In all fairness, kinematics and optics / sensory detection are extremely complex, so while it’s a bit of a shame it’s not a massive disappointment.


As seen in the sketches above (Spore’s Creature Skin Painting, Ocean Quigley, Maxis) you can see they started with plausible (if stylized and often unrealistic) references; targets the system should be able to approximate. They used a system of world-space mapping too, with limbs broken into two shells on an automatically packed UV sheet. In the image on the right, you can see various masks applied both to the limbs (pattern fades out to base at extremities) and separate packed masks for the spikes and mouth, referencing their own colours (bone white and tongue pink) and the base colours of the creature.

All in all, their system did fairly well, especially considering the meshes it had to work with and the expectations of the users. It successfully rendered plausible, if often fantastical, skins for a wide variety of things and was simple enough to use.
