Water rendering is always a fun topic. There’s a multitude of rendering problems that consumer-grade PCs just generally aren’t great at, and while most of these can be dealt with, to some degree, I’ve found that attempting to work through all of them is something you need to budget half the frame time towards. On the other hand, well-realized water is gorgeous, breathtaking and terrifying, and worth every millisecond you spend on it.

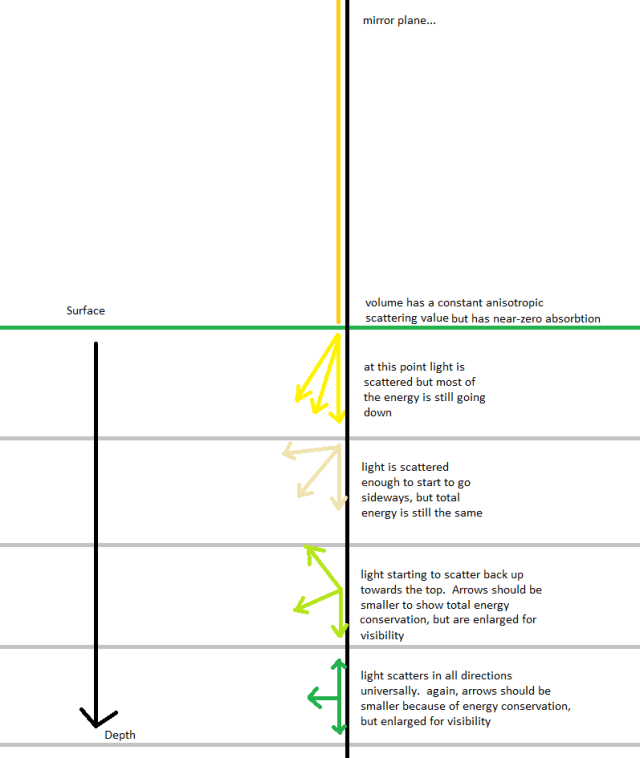
Starting with the volume of the water, the first thing to consider is how water absorbs light. This is how you get the characteristic blue-ish fade as the depth or distance increases, and is the primary rendering aspect when underwater. The math behind this bit is surprisingly easy; you have a coefficient c raised to power d. The power d is simple the distance the ray travels through water in meters; if the camera and object are underwater it’s the pixels’ depth in meters, if one is above it is just the distance the ray is underwater. Coefficient C is the water absorption value; think of this as how much water is visible after one meter of water. Typically, about half the red light is absorbed per meter; about a quarter of green light, and a tenth of blue light. Thus, the amount of light visible is (0.5, 0.75, 0.9) ^ (distance in meters). As you can see, the result is that blue light penetrates much longer, hence the blue colour of water, but also that green and red light close to the surface/light causes shifts in hue and saturation impossible to achieve with linear fog.


However, this only darkens the scene, and water is often quite bright. This is because, in addition to absorbing light it scatters it. This effect increases as light travels through the volume; not just by vertical depth, but also by light entering the volume at shallow angles, such as sunset/sunrise, or through refraction of light entering a steep wave. Thus, light is scattered more in rough seas and at greater depth; becoming nearly non-directional.
The next primary aspect to deal with is the water surface. This is a vastly complex system; and is very easy to break in unrealistic ways the harder you try for realism.
Firstly, a wave system must be created. Very rarely is a surface of water completely smooth, so it should be able to deal with wind/swell, or footsteps or similar. Wind has a somewhat reliable relationship with wave dimensions – frequency and amplitude. For a given wind speed and direction, and an appropriate surface area (to give waves time to build up), it’s possible to generate an approximate and realistic wave pattern. I recommend the Beaufort scale be implemented as well; a simple scale easily used for testing various sea conditions and calibrating against real-world examples.
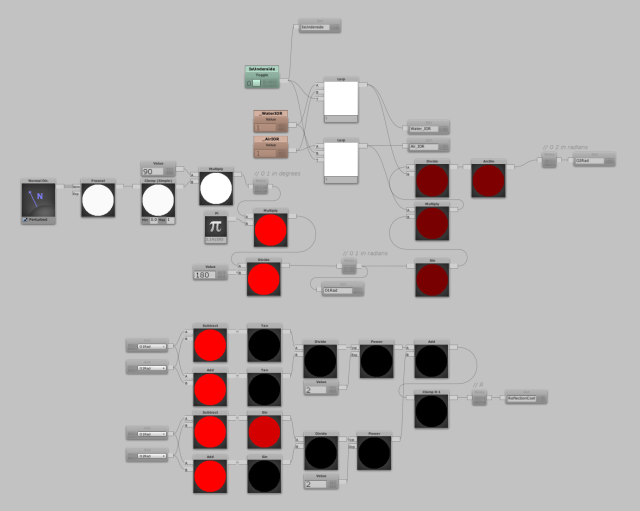
The angle and intensity that the water surface reflects and refracts light is dependent on the index of refraction. Typically, I use a value of 1.33-1.35 for water (depending on water quality) and between 1.00 and 1.03 for air (depending on temperature and humidity). This is actually more useful than just a plain old Fresnel setup; not only is it physically accurate, but if you switch the IOR’s around (see toggle node at the top) it behaves correctly underwater too. When viewed from underwater, the sky can only be seen from a very small window, about 45 degrees from the normal, and at glancing angles the light is entirely reflected, also called complete internal reflection.
The long-time trend towards Deferred and post-based anti-aliasing, as well as more emphasis on roughness and fresnel effects have brought great improvements in quality, but also a particular set of rendering issues. Especially at medium-to-long distances, or at glancing angles, and with surfaces that have high frequency normal detail and low roughness, graphical errors can occur that show sparkling and incorrect specular lighting. This is because as tessellated or normal mapped detail is reduced or mipped out of existence and the surface is rendered as if it’s still perfectly smooth, shown as grainy and sparkling surfaces (specular aliasing) as well as incorrect specular lobes.
Typically the chain of detail goes as such:
Geometric Detail > Tesselated detail + NM + HM> parallax mapping + NM > Normal Map.
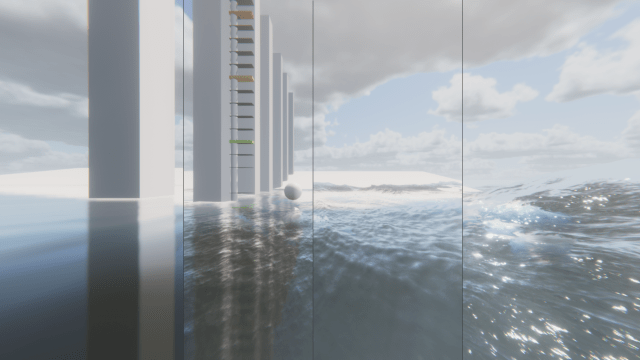
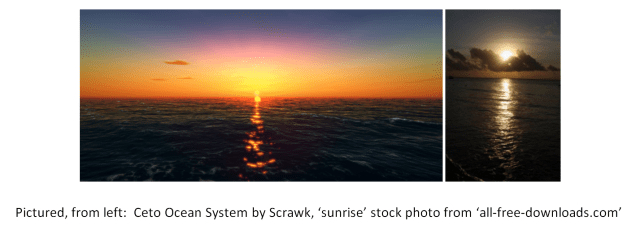
However, while the processes and techniques work well for that chain, it’s actually incomplete. As detail from (waves, in this case) go from being mesh to tesselated to normal mapped, they then…vanish? Note that the spec lobe appears as a tiny point on the horizon in the Ceto pic, still sharp and bright. In reality, the saves have become sub-pixel, and thus so must the lighting calculations. That means adding > Roughness at the end of the chain of detail. The result is that lighting calculations regarding surface detail become somewhat resolution independent, and can be used for large and tiny objects while displaying the correct lighting values.

Working on water systems you come across some weird issues. This one I’m particularly proud of – it explains rendering glitches in other games as well! Any Gran Turismo 5 or 6 players who remember the Ghost of the Nordschliefe appearing at dusk as a faint dark blue triangle on the road, this is what’s happening on a technical level, but doesn’t explain why Polyphony turned the sun blue at night (???) instead of black/off.
This is a symptom of poor self-reflection in games. Full disclosure; I haven’t tested this in Unity 2018.2 HDRP yet; its SSR solution might be what kills it, possibly. Hopefully. The problem arises when the view reflection vector punches through the surface of the object and goes beneath it. Combined with the Fresnel effect maxing the intensity out at glancing angles, it results in glaringly obvious flaws. I’ve attached an example image and a diagram explaining what’s happening below. The solutions seem to be some sort of SSR implementation that can cover it up in a plausible way, or by brute-force marching rays from the camera and computing each intersection/reflection n times or until it exits the surface volume (toooooo expensive for water).


An old project was the underwater cave diving sim. Built on an earlier version of Unity and using the old volume light system. The game was built for VR – making use of the headset as a scuba mask so the weight and form feel functional and immersive. Caves were procedurally generated, and opened up to the surface, the insides of mountains above and below sea level, and the open ocean. Various events such as sharks, giant octopuses, earthquakes and cave-ins could be triggered using an AI directer built of Valve work on L4D.


I tested some coop mechanics as well; you could get hopelessly lost while frantically searching for the diving buddy you can’t find, while a third player can cause you both disasters remotely. I did try and get voice integration working – primarily to measure breathing rate and thus increase the oxygen depletion rate, but I wasn’t able to get is game mechanic stable with solid results.


