April 2019 Notes: This post is a bit out of date by now! While I’m still on 2018.3, and with 2019.1 out as of April 2019, a lot has changed. For instance, the HDRP (including native planar reflections!) is out now, and I’m using that more and more. The public release for the Shader Graph Editor is version 5, and the VFX editor is shaping up nicely to be a GPU-compute-monster pseudo-replacement for Shuriken. NOTE: I’ve moved the Rendering Tech Tricks post to the bottom of this one! Scroll down to view it.
With the 2018 cycle, Unity has released several big graphical features; the scriptable render pipelines (High Definition and LightWeight Render Pipelines), and the Shader Graph Editor that feeds into them. The biggest gain from this isn’t the increase in graphical fidelity using HDRP, or the kick in framerate with LWRP, but rather the fact that users can view rendering as something to put time into.
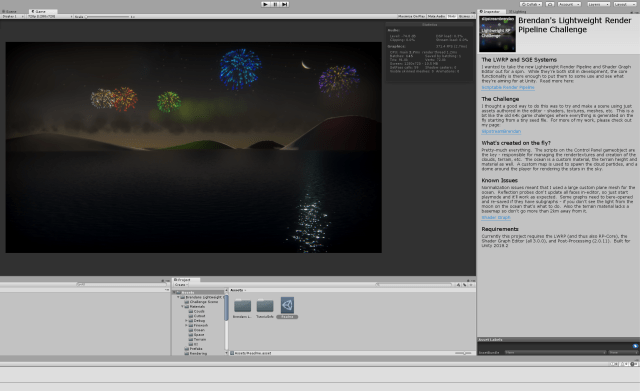
As someone with a long history of using Strumpy’s and Shader Forge I was definitely interested in checking out Unity’s take on the tool. As of now, it’s still in preview, but it’s progressing rapidly and adding features every update. Possibly the biggest gain over and above the private editors is the security of having it be supported by Unity, so things like lighting model changes and version releases aren’t always hanging over your head.
So, how to test it out? Create an entire using only the SGE and scripts. No standard shader, no meshes, no textures to import. Technically I needed one ocean plane mesh, but that may soon be gone as features and fixes arrive.
So, starting with the moon. Pretty basic setup here; Texture (left empty for now) multiplied by a colour and into Albedo. Metal and Smoothness values exposed as sliders for fine adjustment (not bothering with a texture map for them). An interesting point: Ambient Occlusion value is set as 0 (100% occluded) because the moon shouldn’t pick up the sky/horizon/ground ambient the rest of the scene uses. This seems obvious when you think about it, and in reality it would pick up some ambient light from earth, but you can get away with blacking it out in most cases.

The terrain uses a heightmap generated with the SGE. Honestly, I only did something fairly simple with this; remapping the position (x and z in kilometers) into (UV 0-1) and plugging that into a simplenoise node. However, since I wanted to visualize and debug it I set up a camera and a rendertexture lined up above the terrain. Terrain heights cannot be read from a RT, so you’ll need to convert the RT into a Texture2D, which you can do via the script below. Then, that’s read into terraindata.height and the terrain (re)generated.
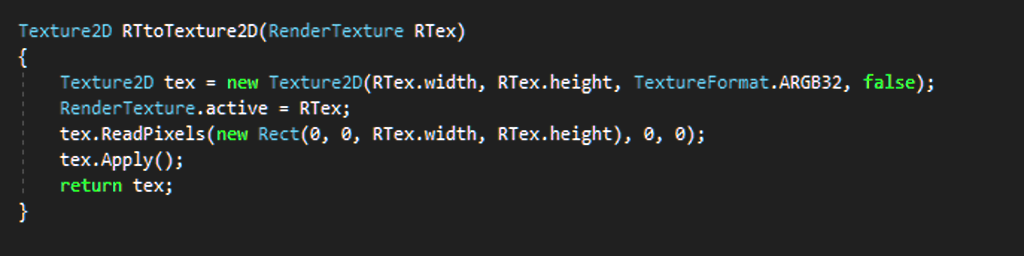
The clouds functioned much the same way. Particle system emitters can use a mask, but again it required a T2D not a RT, so you can re-use the same function (above) to create that. I was a bit more tricky with the clouds; the big problem with them is they’re usually so high and so large that they abruptly vanish at the far plane while nowhere near the horizon; you’re cutting them off too close to the player. What I do then is change the UV fed into the noise, and add my own distance distortion. Sounds weird, but makes the cloud patterns look further than they really are.

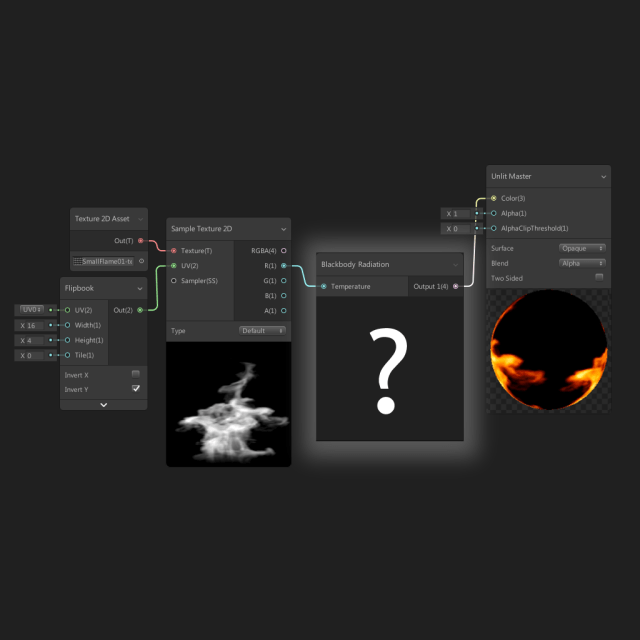
Because of various performance and usability improvements to the Shuriken Particle System since Unity 4 I bit the bullet and did fireworks properly. Each particle is an actual particle, with a trail behind it. I did however move it to a more complex custom shader; using not only blackbody radiation for heat but also spectral emission for the colours of the particles. For example, the colour red in fireworks is usually created with lithium, which has a specific emissive wavelength (colour). Likewise elements like calcium, copper, boron, aluminium, potassium and others have a correct value, and a burn rate that dictates the particle trail length and how it changes (some elements – colours burn off faster than others).
Another trick is using simple quads and layer masks so that the ocean reflection only has to render a single quad, rather than thousands of particles and trail segments every frame.
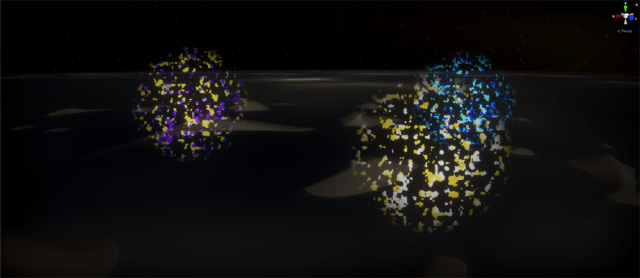
The big drawback with this is that in the future you’d want an editor to handle this in a reasonable manner; assigning element materials to particle systems, handling burn rates, etc. We’ll see how the VFX Editor (due in 2018.3?) can help with this when it releases!
Beyond that there’s still a lot to do on the project. As features and fixes release I want to test them out, along with more use case scenarios – how easy is it to create a common shader like X, what sort of performance do I get when doing Y, does it work with the new Z feature? I also want to try out the colour grading a whole lot more. Things like that.
I considered using the old fireworks particle shader (pictured below) but unless you’re targeting mobile, and having many fireworks in the background, the performance boost is marginal. In the below example, each particle is a single quad + another quad for the smoke/flash. The shader takes 4 packed ramps in a texture of where each particle travels, from black (center point) to white (fade out) and masks along it over time (transmitted via particle colour as vertex alpha). Even back in 2012 on a 2008 laptop these particles were essentially free in terms of performance so long as you didn’t stack them in front of each other much.

For now the current release is v0.3 of the demo scene.
README:
Download project, unzip, then open project with Unity.
Requires Unity 2018.2
Unity Package Manager
RP-Core + Lightweight RP + Shader Graph Editor v3.0.00
Post Processing v2.0.11
For performance measurements, note that the Render Pipeline Asset has a resolution scale of 2.0 – effectively 2x supersampling AA. If you have performance issues, try turning that value to 1-1.5; that should make it run faster.
The Reflection Probe capture doesn’t happen every frame unless you’re in play mode, use that to get full reflections.
If you need to regenerate terrain, clouds, etc, the options are in the Control Panel GameObject in the scene hierarchy.
Update!
Rendering Tech Tricks – Brisbane Unity Developers 2018 Presentation
If you’re looking for more info on the LWRP and SGE, I’m moving the assets from my Rendering Tech Tricks presentation here. Take a look, it’s got some interesting tips, and neat info.
or the full presentation slides, click the picture at the bottom of this post! The Brisbane Unity Developers is a great group to be a part of – check them out by clicking here to view their MeetUp Page.
I recently did a short presentation for the Brisbane Unity Developers group, on the world of rendering and general technological debauchery. This is built off the core fact that everything you render is subject to some sort of compromise, such as usability, speed, requirements or scalability. Another big cost to pay is the man-hours dedicated to getting up to speed in the first place; something that rendering tech has a massive problem with – why would you ever dedicate a team member to it when you could have them scripting your mechanics or building your art assets? The goal of the talk was to show people that rendering isn’t mystical black art, nor some kind of witchcraft, and that decent results can be found from quite modest investments in time and effort.
The Shader Graph Editor from Unity, and the previous Strumpy’s, SF, and Amplify, as well as the Unreal and other solutions are the key to this. By translating the usual operations (add divide, dot product) into nodes that plug into each other, it means that beginners don’t have to worry about using the wrong types, names, or trying to do an operation of incompatible value types.

One simple application is in coloring your FX. You’ll come across many different types. Fire and flames, liquids like water, electricity and glowing energy beams. I go over multiple methods to achieve these and more; colour extinction, blackbody radiation, gamma coloring, and some alternative UV usage.
Another point of interest is the distortion apparent in most games. Since realtime applications (almost?) always use single point projection; projecting rays from one point through the near plane out to the far plane, the only time where no distortion is apparent is when the player’s face is in exactly the right position.
If the player moves their head back a bit, or increases the field of view of the game camera, it’s common to see horrible stretching around the edges of the screen, while the center gets much smaller. This is illustrated in the image below – check out the shape of the sun!


For reference, the vertical field of view is 90 degrees, so if you expand the bad image (left one) and then move your eyeball one (image height) away from the screen directly in front of it, the perspective will be right and the sun will look circular again. In every other circumstance, the image on the right looks better.
Also note that since the camera is rotated 5 degrees left, there’s some new mountains clipping into existence in the background! That’s why you have a good distance fog setup, to hide that when it happens so players don’t see things popping in when they just turn the camera or move. On the topic of fog, remember that it doesn’t just change the colour of objects based on how far away they are, but it can also blur them. The most obvious example is light getting scattered underwater, and the most simple, easiest, quickest way of dealing with it is to just use the depth of field effect that Unity has.

For the full presentation slides, click the picture below. The Brisbane Unity Developers is a great group to be a part of – check them out by clicking here to view their MeetUp Page.

