This is the second of a series of posts on Automotive (and similar) applications for real-time engines such as Unity. In this part, I’ll go over the some of the more advanced technical and rendering concepts in HDRP for Unity, shader graphs, fine-tuning your colour grading and script integration. This section isn’t for beginners, so some experience with PBR materials, SGE and Unity will be needed.
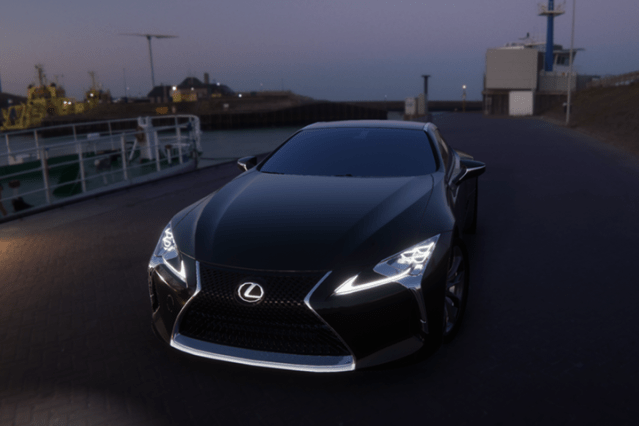
One of the most popular tricks with rendering vehicles is compositing a computer-generated image over a real photo/video background. This has been used for many years in cinema, though with the level of lighting complexity required to make the image plausible, along with the recent advances in real-time-rendering, there’s been some big changes. For realtime and semi-realtime applications, look no further than the ‘Scapes’ Photo Mode in Gran Turismo Sport:


So, a ‘quick’ overview of the process, and some things to look out for when building systems like this in Unity. For this, I’m using 2019.1 and HDRP 5.3, with the Measured Materials Library, the Unity HDRI Pack, and some HDRI from the Unity Asset Store; Dutch Free 360* HDRI Vol 1+2. Another fantastic resource is the HDRI Haven, a great source of free environments (and back-plates!).

Since the 3d model will be superimposed on a photo or video, what you’re looking for is to capture the reflections, ambient lighting, and other ‘secondary’ effects like ambient occlusion, particle effects, etc. For that, all you need is a simple 3d model of the background (above, top left). Instead of texturing everything meticulously, you use cubemaps projected onto the environment. This does result in stretching/distortion (see the table on the right side of the room), but generally this isn’t noticeable and you can get away with some pretty dodgy alignment, a lot more than you think.
The cubemap re-projection can be as simple or complex as you like. For the basics, the sampled position is effectively world position, normalized and negated. Think of it as the position on a sphere, you’re mapping all points to a surface around the camera, then projecting that colour out until it hits something, a bit like a point light.

So, what does it look like in an environment? From any perspective other than the cubemap, pretty terrible. Remember, the cubemap is only correct from the exact position it was taken. Especially when you’re only using one cubemap, in an environment that isn’t completely concave.
This is typically what happens when you move the camera:

In order for the CG object to affect the world; to cast shadows, reflect light, or even light the area with headlights, the environment has to be lit. This is the tricky part; you have to create a material that uses the cubemap for colour reference, but also respects the PBR smoothness/metallic workflow. And, if need be, normal maps, and even transparency.
One of the interesting parts of this technique is getting the scale right. Often you won’t have true dimensions available, so you’re going to have to figure out how big things are. From the cubemap’s position, scale is irrelevant, only direction matters. You can scale the entire scene in and out from that position, and it won’t change a thing. But, for adding in vehicles that have actual size, you’ll want to get it right.

Now, some things to watch out for. Firstly, since the vast majority of these HDRI images are built from the reflection off a chromeball, you’re at the mercy of a shiny sphere being photographed with a camera. Any bumps, distortion or imperfections on the ball, or lens distortion in the camera, will mean slightly wobbly panorama. Literally, a degree off at the capture stage can mean that lines which should be straight, won’t be. Oh, and don’t expect the panorama to be perfectly level along the horizon, you’ll likely find it’s a few degrees tilted. And remember to ‘reset’ the light temperature/exposure, then render, THEN re-colour-grade and re-expose it in post-processing.
Tonemapping
Currently, tonemapping in Unity basically boils down to 2 options. Neutral, which washes everything out and looks bland. Or ACES, which basically reproduces the non-linearity of light being burnt onto rolls of FujiFilm camera film (physically-based-rendering is maybe getting out of hand). In many cases, ACES looks ‘the best’. It’s what many are used to since it’s used in Film and TV so often, it’s reasonably high contrast, keeps colours saturated, and in fairness seems to do a fairly reasonable job of things.
The problem is the ‘filmic’ aspect of ACES. By definition, it isn’t a clean, natural tonemapper. It’s stylized. Certain effects are baked in. Colours shift, which isn’t great for rendering fancy materials in car paints. And it’s not especially adjustable for future HDR displays. So several teams have built more modern systems, including the Gran Turismo team (at Polyphony Digital, Sony).
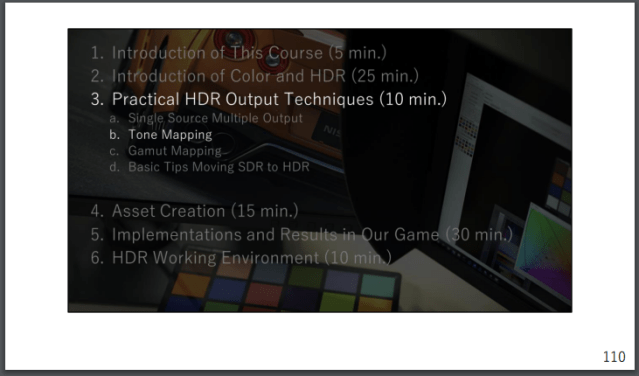
So, what makes for a good system? Firstly, you’d want to have something tune-able, adjustable (where do the mid-tones blend into highlights, and how smooth the blend is). Then, for sections you want some sort of exponent or co-efficient that controls the shape of the curve.
Typically you will want to adjust the darker areas for the sake of contrast; it should look like an exponential curve, y = x^1.5 (for example), up to a point. The mid-tones, curiously, are what makes an image seem ‘real’. For all the contrast/saturation adjustments you make, it’s the absolute linearity of this section that is the most important. So getting that section right is absolutely critical. Towards the highlights, linearity becomes slightly less important. Strong lights can blow things out, so bringing them back is always going to mean a flattening curve. This causes a problem – colours WILL shift slightly in the highlights. For example, a bright yellow light near red car paint will send the surface highlights / reflections slightly off-tone, but until HDR screens get better, and ideally standardized, it’s just something that you have to live with.
Scripting the HDRP Volumes
The change to Volumes for everything is pretty good, but with one big problem. The scripting reference (as of 14/5/19) lacks any real-world examples, so despite being a pretty good system, is scary and unknown to many people.
Scripting the Volume System in HDRP (including PPv3, its own post-processing system) is similar-ish to what you used to do with PPv2, but with a lot of name changes, and the requirement to have a certain line at the top of the script (just put this with the rest of them).
using UnityEngine.Experimental.Rendering.HDPipeline;

The HDRP Volume Manual can be found HERE, though to be honest you should try the example shown above. It’ll get you started, which is the most important step. Hopefully Unity releases some good examples/tutorials in the future, because this system is very powerful and otherwise a joy to use.
In the next part, I demonstrate some implementations and example, and get to some more images taken in Unity.
